Easy, Inexpensive DIY Roll-Away Quilting Design Wall!
6:00:00 AMI'm really excited to share my easy, cheap roll-away design wall tutorial today!
If you've been reading along with my blog for a while you may know that I've been in the slow and painful process of reno-ing my basement sewing space. It's been a two year project in the making -
Basement when we moved in 2 years ago:
...and a during picture at some point in the 2 years of chaos... (OY!)
...and what my space looked like a few weeks ago, the front half of the basement and side wall complete -
part of this reno saw me lose my design wall space - which sat on the wall to the right where the bank of glass covered book-shelves sit now - which meant that I had to come up with a solution for some sort of portable or hide-a-way design wall for my space.
I don't have the space to be moving a foam covered board around, and, my sewing space also shares a spare 'room' bed with guests who come to visit and my husband's 'office' corner - all of this crammed into the basement half-basement.
So. I needed something I could hide. Here's what my hacker brain came up with.
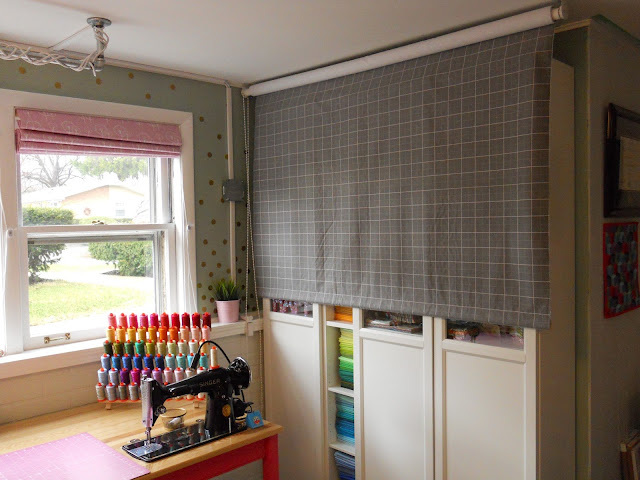
I needed to make it roll away. So here it is! An easy, cheap, roll-away design wall system that can be ceiling or wall mounted!
Supplies:
*this post contains affiliate links to Amazon at no additional cost to you. For more information, please visit my Disclosure Statement and Advertising Policies page.
- 28mm Roller Shade Hardware, like this
- Design Wall flannel - I used this one by Kaufman:
- 1.0" *inner diameter* PVC Pipe cut to 61"
- 0.5" PVC Pipe cut to 59"
- 0.75" Velcro Tape
- Sand paper
- Gorilla Glue
- Screws and Wall Anchors
- Drill, Bits, Hammer, Sharpie marker
Options for design wall flannel to consider:
- Backside of laminated table cloths (flannel backed)
- Gridded flannel yardage
- Fons and Porter Design Wall(aff link to Amazon)
A note/tip from one of my readers, Quilting Farm Wife:
Hi!! going to finish up the design wall soon. Wanted to offer an additional clarification on PVC size (farmers here!! LOL) The interior diameter of the PVC is affected by it's rating for PSI. 450 PSI is the size that you'll need. 200 PSI is a thinner wall, thereby making the mechanism too small. :)Thanks Quilting Farm Wife!!
Directions:
1. After determining how wide you'll need your flannel for your design wall and cutting it accordingly, and cutting your PVC pipe about 1" larger than the finished width of your design wall, attach one side of your Velcro tape to the wrong side of the top side of your flannel wall using 2 rows of stitches.TIP: After completing this step, your needle will be all gummy from the glue from the backside of the Velcro tape - either clean the needle carefully with alcohol wipes or just replace it before continuing.
2. Using a quilting ruler and a Sharpie marker, draw a straight line across your larger PVC pipe - this will be a reference line for your other piece of Velcro. Place Velcro (using it's sticky tape backing) on pipe.
3. Add a dowel pocket to the bottom of the design wall to accommodate the smaller PVC pipe approximately 2" wide. (I didn't bother to even trim the manufacturer edge off and roll a finished edge - I was trying to keep the bulk to a minimum (and let's face it, the work to a minimum, too)
 |
| add a nice large dowel pocket to the bottom of your design wall to accommodate the 0.5" PVC pipe piece |
4. Zigzag the edge of your design wall to finish the edge (or use a serger to finish the edge). A folded, finished seam may add too much bulk, and when rolling an especially large design wall up you may not have enough clearance between the ceiling and the pipe if you roll a hem, hence the zigzag. Leave dowel pocket end open.
5. You may need to sand your clutch hardware down slightly in order for it to fit snuggly inside the PVC pipe - do not over sand and note - the plastic is brittle. Ask me how I know this. I went through 2 mechanisms because the first I tried to cut instead of sand. It doesn't work. Sand. It doesn't take that long, believe me.
6. After ensuring the mechanisms will fit snuggly, pop them in place with a bit of Gorilla Glue (aff link to Amazon) (don't skip this step - if you do, the mechanisms will spin under the weight of the flannel - again, ask me how I know...) and allow to dry overnight.
 |
| make sure you glue your hardware in place and that it fits snuggly and flush. |
7. Attach the hardware to your ceiling/wall with the PVC pipe in place. Attach the flannel via the Velcro strip to the PVC pipe, slide your smaller PVC pipe into the dowel pocket and you're ready to roll!
This picture shows it only about half way - it rolls all the way to the floor, so it's nice and long!
What I love about this is that because of the Velcro, I can swap out deign walls when I want - I can take this down and take it to retreats or sew alongs, it's not permanent.
I hope you enjoyed this tutorial!
I am in the midst of finishing up the tutorial for my DIY IKEA cutting table with storage too - hopefully in the next couple of days that one will go live as well. Checking all sorts of to-do's off my list!
*this post contains affiliate links to Amazon at no additional cost to you. For more information, please visit my Disclosure Statement and Advertising Policies page.








22 comments
This is brilliant, Erin! We're are considering turning our spare room into a sewing room (it will require building a wall bed) and there will definitely be no room for a design wall. This would work perfectly! Thanks :)
ReplyDeleteI have been thinking about doing the same thing in front of my fabric shelves for space as well as keeping the sun off of my fabric. I already had to hide all my pretties in baskets because some of them were getting sun damaged. I love your tutorial. Thank you once again for sharing.
ReplyDeletegreat design! And you can make a replacement wall out of solid white to take pictures to submit your quilts to shows.
ReplyDeleteWhat a great idea. Very creative.
ReplyDeleteI have needed this for awhile. I just did not know how to do it. Now I do! Thank you.
ReplyDeleteI love this idea so much Erin!
ReplyDeleteMy only issue would be is that it doesn't look stable for putting the blocks on, nothing behind to keep it stable / stiff as if it were up against a solid wall. I've used portable design walls on frames and that is what I don't like about them.
ReplyDeleteThis won't be for everyone, Karen! And would be exactly why I put the design wall up so that when it dropped, it dropped in front of my cabinets so that they sit behind to support. You would need to take that into account when mounting the roll away system - it would ideally need to be in front of a wall, so the brackets (as I wrote in the post) could either be wall mounted or ceiling mounted.
DeleteIt's not for everyone. Thanks for stopping by and leaving a comment! ❤
Hi there! I was daydreaming about a design wall, and stumbled across this post from Pinterest. How much yardage of the grid flannel did you use? And, how heavy was the whole operation once assembled? I'm trying to find the right place in my cramped craft / sewing room for a wall, and this idea just might be the ticket! Brilliant!
ReplyDeleteHey Corky!
DeleteI ended up using 3.5 yards, 1.75yards cut in half and then sewn together along the selvage, then the top selvage edge attached to the ceiling mount. The amount of fabric you need will depend on how wide you want your design wall to be, though.
As for the weight of the project, it's relatively light. I would say the whole thing is easily under 10lbs.
Hope this helps!
This is SOOOOO brilliant!! I would never have thought of it, THANK YOU!! I can't wait for to get it up and going.
ReplyDeleteEsther
I think this is genius. I plan to make it when my father-in-law comes to visit for Thanksgiving!
ReplyDeleteLove the design! Super easy to follow and put together. Just put together mine tonight. Used the Fons and Porter prepackaged design wall and attached it to the pvc just like you showed. Can’t wait to hang it tomorrow! It might be worth noting, though, the top pvc pipe is marked at 1 inch size in Lowes and Home Depot. I picked up the one marked 1.5 inch first and when the 28mm blind hardware came in, the pvc was miles too big. Husband mentioned something about the difference between inner and outer pipe circumference measurements.
ReplyDeleteThanks for this clarification, I'll make the edit now! 😘
Deletewell done. This is awesome.
ReplyDeleteQuestion:
ReplyDelete1.5” pvc is roughly 38mm inside diameter. Your instructions say 28mm clutch kit. My math doesn’t work out, can you please elaborate?
Hi Mike!
DeleteI edited above to clarify, 1.0" inner diameter off and you'll have to shave down the clutch mechanism to get a snug fit. Hope this helps!
This is great! It's been a year since you posted this...how's it holding up?
ReplyDeleteThanks for making it seem so easy and affordable! love it!
(txdanks@mail.com)
I still love it! Totally worth the little bit of work :)
DeleteHi!! going to finish up the design wall soon. Wanted to offer an additional clarification on PVC size (farmers here!! LOL) The interior diameter of the PVC is affected by it's rating for PSI. 450 PSI is the size that you'll need. 200 PSI is a thinner wall, thereby making the mechanism too small. :)
ReplyDeleteThanks so much for this, QFW!
DeleteThis is genius!!! Thanks so much for sharing
ReplyDeleteI ♥ to hear from you!
Thank you for taking the time to leave a comment or for asking me a question. Rather email me? Reach out at sewathomemummy@gmail.com.
I like to email everyone back when they've commented - so if you're a no-reply blogger, make sure to leave your email address in your comment so I can share the love back atcha!