How to quickly (and easily!) remove paint from old hardware using items in your kitchen!
3:38:00 PM
As many of my readers whom also follow me on Instagram may already know, I've been in the midst of a summer-long kitchen 'reno' (and I say 'reno' because I'm using the term loosely - I'm pretty much just putting lipstick on a pig - the kitchen needs a full gut but financially that likely won't happen for another decade, so, I'm doing my best to make it prettier...).
Part of the reno has been repairing and painting the cabinets and windows. They are all original to the 1959 build.
The hardware on my original wood-framed windows had been painted in place. Which, in turn, led me to believe that said hardware was in such bad shape that at some point, it all needed to be painted. So - my plan was to strip the hardware in preparation for spray painting (of which, I had already picked out).
 |
| Oh boy. I had my work cut out for me (or so I thought)... |
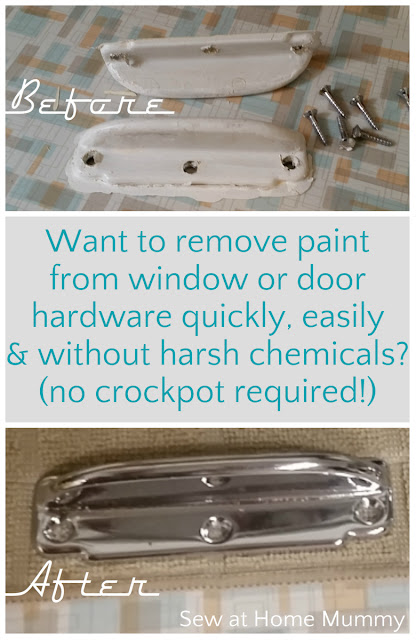
Oh, how wrong I was. Once stripped of all of their bad paint jobs, the locks and handles were in near-mint condition, and definitely did NOT need to be re-painted:
 |
| Holy chrome, Batman! Mild pitting under the lip of one handle (left) but otherwise, mint! |
SO! Want to know my super sneaky, very quick and easy, no-crockpot-cooking technique for removing paint from your old hardware, so easy that the paint all peels away, just like in my video below??
(I've added links to the product brands I used below for your reference)

Old bowl
Baking soda
Hot water
Rubber Gloves
Simichrome Polish (or a polish appropriate to the metal hardware you have)
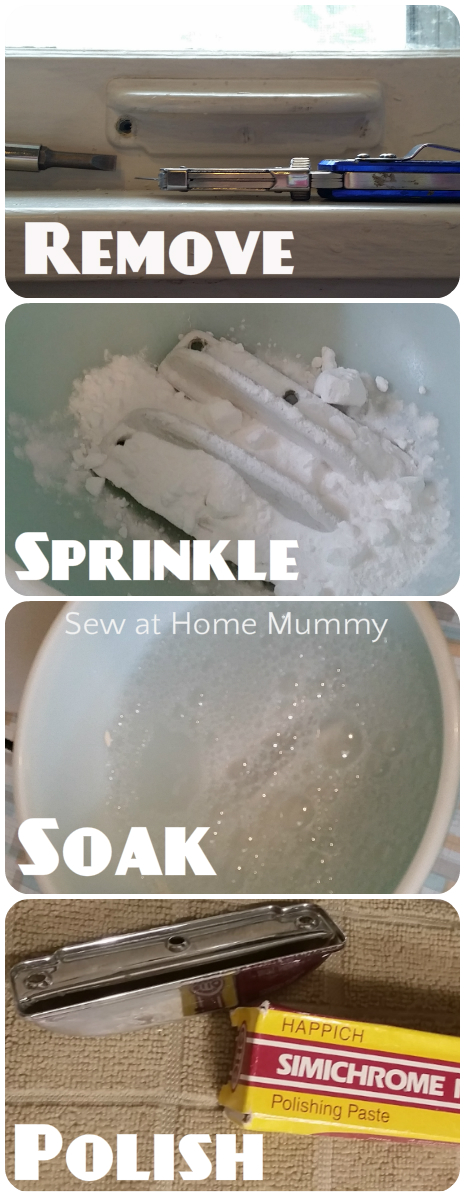
^Utility knife
^a note about removing painted, stuck-in-place hardware:
 Sew at Home Mummy Tip:
Use a sharp utility knife or Exacto to etch a groove between where the hardware meets the door or window. Be very careful not to gouge the frame or the hardware.
1. Put your hardware in an old bowl.
2. Cover hardware with baking soda - 3 or 4 tablespoons should do, but at the same time, don't be shy - especially if you're doing a large amount of hardware at once.
3. Pour boiling water over hardware to cover.
4. Allow water to come to room temperature; using your rubber gloves, peel away the paint by hand. Avoid using anything sharp to scrape the paint off as you may scratch the surface.
5. Rinse. Dry with a soft towel.
6. Polish - I had chrome hardware and used Simichrome Polish to buff and shine them up. Use a metal polish appropriate to the metal type you're dealing with.
 Sew at Home Mummy Tip:
make sure to take appropriate precautions in handling your paint-covered hardware if you think there's a possibility lead paint may have been used.
Super quick, super easy. I was so surprised (an ecstatic!) to have uncovered such pristine hardware!
Try it! It's a really impressive technique!
*this post contains affiliate links to Amazon at no additional cost to you. For more information, please visit my Disclosure Statement and Advertising Policies page. Thank you for supporting this blog and all of its free tutorials!


1 comments
Sounds great!
ReplyDeleteI ♥ to hear from you!
Thank you for taking the time to leave a comment or for asking me a question. Rather email me? Reach out at sewathomemummy@gmail.com.
I like to email everyone back when they've commented - so if you're a no-reply blogger, make sure to leave your email address in your comment so I can share the love back atcha!